|
|
||
|---|---|---|
| .. | ||
| keytools | ||
| README.md | ||
| generate_key.bat | ||
| sign_test_app.bat | ||
| target.h | ||
| test-app.icf | ||
| wolfBoot-test-app.eww | ||
| wolfboot-test-app.ewd | ||
| wolfboot-test-app.ewp | ||
| wolfboot.ewd | ||
| wolfboot.ewp | ||
README.md
wolfBoot demo application for IAR EWARM
Instruction to compile and test under MS Windows.
Target platform
This example application has been configured to work on STM32F4.
wolfBoot is stored and executed at the beginning of the flash (0x08000000), while the signed application image starts at address 0x08020000.
$template=Get-Content -path ..\..\include\target.h.in;
Get-Content -path ..\..\config\examples\stm32f4.config | ForEach-Object {$v=$_.Split('?='); $a=$v[0]; $b=$v[2]; $template=($template -replace "##$a##",$b) };
$template=($template -replace "##.*##","");
Set-Content -path target.h $template
Workspace
The workspace wolfboot-test-app.eww contains two projects:
- wolfBoot
- wolfBoot-test-app
Each project will compile into a separate binary, the two binaries can be uploaded to the target using ST-Link utilities (e.g. STSW-LINK004) as explained below.
Instructions
Creating the keys
This step is required to compile the bootloader.
Open a command line terminal in the IDE/IAR directory. Execute the following script:
generate_key.bat
The script will generate a keypair. The file wolfboot_signing_private_key.der in the root of the repository contains the private key that will be used
to sign valid firmware images. The file src/keystore.c now contains the public key that the bootloader embeds in its codebase
to use it later to verify the image.
Compiling and linking the images
Now both projects (wolfboot and wolfboot-test-app) can be compiled and linked.
The two resulting images will be placed in the output directory Debug/Exe:
- wolfboot.bin
- wolfboot-test-app.bin
Signing the firmware image
The test application (main firmware) must be now tagged with a version number and signed. This is done by the script sign_test_app.bat.
The script requires one numeric argument that is used as the version tag for the signed image. Running it with version "1":
sign_test_app.bat 1
Will create a new file named wolfboot-test-app_v1_signed.bin, which will be placed in the output directory Debug/Exe.
Uploading the binary images to the target
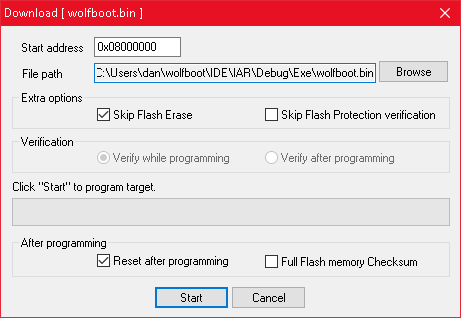
Using the ST-LINK Utility, perform the following steps:
1. Erase the entire flash memory
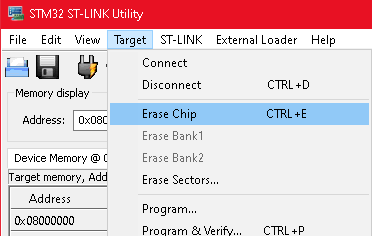
Erase the entire flash memory before uploading the binary files
2. Upload `wolfboot.bin` to address 0x08000000
3. Upload `wolfboot-test-app_v1_signed.bin` to address 0x08020000. Ensure that the flag "Skip Flash Erase" is active.

Verify that the system is up and running
If you are using a STM32F407-discovery board, a red LED will turn on upon application boot.
Armored Mode (Glitch Resistance)
If you would like to enable the "Armored" mode (glitch resistance) in IAR you can set the compiler pre-processor macro WOLFBOOT_ARMORED. Note: This has only been tested with ECDSA on Cortex-M.