43 KiB
Introduction
FreeDV GUI (or just FreeDV) is a GUI program for Linux, Windows, and macOS for running FreeDV on a desktop PC or laptop.
This is a live document. Notes on new FreeDV features are being added as they are developed.
Getting Started
This section contains instructions to help you get started.
Easy Setup
Upon starting FreeDV for the first time, the Easy Setup dialog will appear. This is a streamlined setup process for FreeDV optimized for hardware commonly used by amateur radio operators and is divided into three sections:
- Sound card configuration,
- CAT/PTT control, and
- Reporting.
These sections are shown below:
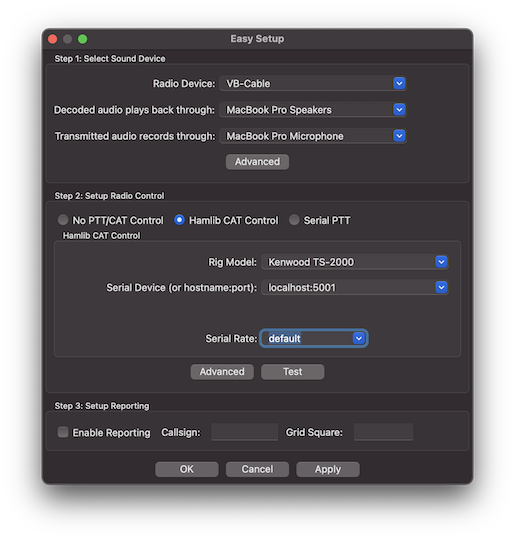
Note that you can always return to this dialog by going to Tools - Easy Setup.
Sound Card Configuration
To configure your sound card(s) using Easy Setup, simply select the sound device associated with your radio and the microphone and speaker devices you wish to use to hear decoded audio as well as to transmit audio. If you're setting up a receive-only station, you can choose "None" for the transmit audio device.
Additionally, if you are using a Flex 6000 series radio on the Windows platform, FreeDV will automatically select the DAX TX sound device. It is necessary only to select the correct "slice" for the radio sound device and the two devices to use for analog receive and transmit (e.g. your computer's built in microphone and speaker devices).
Note that some configurations (for example, SDR setups involving multiple radio sound devices) may not be able to be configured with Easy Setup. For those, you can choose the "Advanced" button and proceed to "Advanced Setup" below.
CAT/PTT control
Easy Setup supports three methods of radio control:
- No radio control (e.g. using a VOX audio device such as SignaLink),
- Hamlib CAT control, and
- Serial port PTT control.
Simply select the option that matches your radio setup and the required fields will appear. For Hamlib, these are typically the type of radio you're using as well as the serial port it's connected to (or TCP/IP hostname:port). Serial port PTT control requires the serial port your radio is using as well as whether your radio's PTT is triggered via the RTS or DTR pin (and the required polarity for either).
If required, the "Advanced" button in this section will allow you to configure PTT input (e.g. for a footswitch) and additional VOX related options. The "Test" button will emit a constant carrier on the selected radio sound device as well as enable PTT to allow you to adjust your radio sound levels (see "Sound Card Levels" below).
Reporting
While not required, it is recommended to enable reporting so that others can see who is currently receiving them. This also allows the FreeDV application to control the radio's frequency and mode. Both sides of a contact must have this enabled in order for contacts to be reported. To configure reporting, simply enable the feature here and enter your callsign and current grid square/locator.
For more information about the reporting feature, see the "FreeDV Reporting" section below.
Advanced Setup
Sound Card Configuration
Receive Only (One Sound Card)
For this setup, you just need the basic sound hardware in your computer, for example a microphone/speaker on your computer.
- Open the Tools - Audio Config Dialog
- At the bottom select Receive Tab
- In Input To Computer From Radio select your default sound input device (usually at the top)
- In the Output From Computer To Speaker/Headphones window select your default sound output device (usually at the top)
- At the bottom select Transmit Tab
- In Input From Microphone To Computer window select none
- In Output From Computer To Radio window select none
- Press OK to close the dialog
When you press Start FreeDV will start decoding any incoming signals on the microphone input, playing the decoded audio out of your speaker. If no valid FreeDV signals are received, no audio will be played.
If you connect the microphone input on your computer to your radio receiver, you can decode off air signals. If you have a rig interface, try configuring that as the From Radio To Computer device, with your computer's sound card as the From Computer To Speaker/Headphone device.
If you don't have anyone to transmit FreeDV signals to you, try the test wave files in the next section.
Transmit/Receive (Two Sound Cards)
For TX/RX operation you need to configure two sound cards, by setting up Tools - Audio Config Transmit and Receive Tabs.
When receiving, FreeDV off-air signals from your radio are decoded by your computer and sent to your speaker/headphones, where you can listen to them.
When transmitting, FreeDV takes your voice from the microphone, and encodes it to a FreeDV signal in you computer which is sent to your radio for transmission over the air.
| Tab | Sound Device | Notes |
|---|---|---|
| Receive Tab | Input To Computer From Radio | The off air FreeDV signal from your radio rig interface to your computer |
| Receive Tab | Output From Computer To Speaker/Headphones | The decoded audio from your computer to your Speaker/Headphones |
| Transmit Tab | Input From Microphone To Computer | Your voice from the microphone to your computer |
| Transmit Tab | Output From Computer To Radio | The FreeDV signal from your computer sent to your rig interface for TX |
Changing Audio Devices
If you change audio devices (e.g. add or remove sound cards, USB hardware), it's a good idea to check the Tools/Audio Config dialog before pressing Start, to verify the audio devices are as expected. This is particularly important if any audio devices e.g. Headsets, USB Sound Cards, or Virtual Cables have been disconnected since the last time FreeDV was used.
Hitting Refresh in the lower left hand corner of the Tools/Audio Config will normally update the audio devices list. Keeping a screen shot of a known working configuration will be useful for new users. Unexpected audio configuration changes may also occur following a Windows updates.
Another solution is to re-start FreeDV and check Tools/Audio Config again after changing any audio hardware.
CAT/PTT Configuration
The Tools->CAT and PTT Config dialog supports three different ways to control PTT on your radio:
- VOX: sends a tone to the left channel of the Transmit/To Radio sound card
- Hamlib: support for many different radios via the Hamlib library and a serial port (or via TCP/IP for some devices, e.g. SDRs or FLrig/rigctld).
- Serial Port: direct access to the serial port pins
You may also optionally configure an additional serial port for PTT input. This can be useful for interfacing devices like foot switches to FreeDV. If configured, FreeDV will switch into transmit mode (including sending the needed Hamlib or serial commands to initiate PTT) when it detects the configured signal.
Once you have configured PTT, try the Test button.
Serial PTT support is complex. We get many reports that FreeDV PTT doesn't work on a particular radio, but may work fine with other programs such as Fldigi. This is often a mismatch between the serial parameters Hamlib is using with FreeDV and your radio. For example you may have changed the default serial rate on your radio. Carefully check the serial parameters on your radio match those used by FreeDV in the PTT Dialog.
Also see Common Problems section of this manual.
Hamlib
Hamlib comes with a default serial rate for each radio. If your radio has a different serial rate change the Serial Rate drop down box to match your radio.
When Test is pressed, the "Serial Params" field is populated and displayed. This will help track down any mismatches between Hamlib and your radio.
If you are really stuck, download Hamlib and test your radio's PTT
using the command line rigctl program.
Icom Radio Configuration
If using an Icom radio, Hamlib will use the radio's default CI-V address when connecting. If this has been changed, you can specify the correct address in the "Radio Address" field (valid values are 00 through FF in hexadecimal).
Note that "00" is the "wildcard" CI-V address. Your radio must have the "CI-V Transceive" option enabled in order for it to respond to commands to that address. Otherwise, FreeDV must be configured to use the same CI-V address as configured in the radio. For best results, ensure that there are no other Icom/CI-V capable devices in the chain if "00"/"CI-V Transceive" is used.
Changing COM Port On Windows
If you change the COM port of a USB-Serial device in Device Manager, please unplug and plug back in the USB device. Windows/FreeDV won't recognize the device on the new COM Port until it has been unplugged/plugged.
Test Wave Files
In the installation are audio files containing off-air FreeDV modem signals. There is one file per FreeDV mode and are in the following locations depending on platform:
| Platform | Typical Location |
|---|---|
| Windows | C:\Program Files\FreeDV [version]\share\freedv-gui\wav |
| Linux | /usr/share/freedv-gui/wav or /usr/local/share/freedv-gui/wav |
| macOS | See https://github.com/drowe67/freedv-gui/tree/master/wav |
To play these files, first select a FreeDV mode and press Start. Then choose a file using "Tools - Start/Stop Play File From Radio". You should then hear decoded FreeDV speech.
These files will give you a feel for what FreeDV signals sound like, and for the basic operation of the FreeDV software.
Sound Card Levels
Sound card levels are generally adjusted in the computer's Control Panel or Settings, or in some cases via controls on your rig interface hardware or menus on your radio. In-app adjustments can also be done by using the 'TX Level' slider at the bottom of the main screen; anything below 0 dB attenuates the transmit signal.
When FreeDV is running, you can observe the sound card signals in the main window tabs (From Radio, From Mic, To Speaker).
-
On receive, FreeDV is not very sensitive to the From Radio level, adjust so it is mid-range and not clipping. FreeDV uses phase shift keying (PSK) so is not sensitive to amplitude.
-
The transmit level from your computer to your radio is important. On transmit, adjust your level so that the ALC is just being nudged. More is not better with the FreeDV transmit signal. Overdriving your transmitter will lead to a distorted transit signal, and a poor SNR at the receiver. This is a very common problem.
-
FreeDV 700D and 700E can drive your transmitter at an average power of 40% of its peak power rating. For example 40W RMS for a 100W PEP radio. Make sure your transmitter can handle continuous power output at these levels, and reduce the power if necessary.
-
Adjust the microphone audio so the peaks are not clipping, and the average is about half the maximum.
Audio Processing
FreeDV likes a clean path through your radio. Turn all audio processing OFF on transmit and receive:
-
On receive, DSP noise reduction should be off.
-
On transmit, speech compression should be off.
-
Keep the receive audio path as "flat" as possible, no special filters.
-
FreeDV will not work any better if you band pass filter the off air received signals. It has its own, very tight filters in the demodulator.
USB or LSB?
On bands below 10 MHz, LSB is used for FreeDV. On 10MHz and above, USB is used. After much debate, the FreeDV community has adopted the same conventions as SSB, based on the reasoning that FreeDV is a voice mode.
As an aid to the above, FreeDV will show the current mode on the bottom of the window upon pressing the Start button if Hamlib is enabled and your radio supports retrieving frequency and mode information over CAT. If your radio is using an unexpected mode (e.g. LSB on 20 meters), it will display that mode on the bottom of the window next to the Clear button in red letters. When a session is not active, Hamlib isn't enabled, or if your radio doesn't support retrieving frequency and mode over CAT, it will remain grayed out with "unk" displaying instead of the mode (for "unknown").
Transceiver Filters
For most FreeDV use, your radio's receive and transmit filters should be set to the widest possible (typically around 3 kHz). This allows easy switching between analog mode as well as the various FreeDV modes. There has not been any testing done to definitively confirm whether narrower bandwidths help with reception of FreeDV. Additionally, FreeDV already performs its own transmit filtering, so using additional narrow filtering on the radio will likely have little benefit (again, untested).
For reference, the channel widths of the currently supported modes are below:
| Mode | Width (kHz) |
|---|---|
| 1600 | 1.125 |
| 700D | 1.000 |
| 700E | 1.500 |
| RADEV1 | 1.500 |
Voice Keyer
The Voice Keyer Button on the front page puts FreeDV and your radio into transmit, reads a wave file of your voice to call CQ, and then switches to receive to see if anyone is replying. If you press the space bar or click the PTT button, the voice keyer stops. If a signal with a valid sync is received for a few seconds the voice keyer also stops.
The Audio tab inside Tools-Options can be used to select the wave file, set the RX delay, and number of times the TX/RX cycle repeats.
Additional options are also available if you right-click on the Voice Keyer button:
- "Use another voice keyer file": Allows you to trigger the voice keyer using a different file from the one configured in Tools->Options.
- "Record new voice keyer file": Triggers transmit and records your microphone audio to a file that you select. Pushing the Voice Keyer button will stop recording.
- "Monitor transmitted audio": Allows monitoring of audio while transmitting the voice keyer file. If enabled, a checkmark will appear next to this option.
Monitoring TX Audio
FreeDV has the ability to monitor transmit audio. This can be useful for adjusting microphone filters when your radio is plugged into a dummy load. To enable this, right-click on the PTT button and choose "Monitor transmitted audio". A checkmark will appear next to this menu option when enabled.
Quick Record
To quickly record incoming signals from the radio, a 'Record' button is provided in the main window. Clicking this button will create a file beginning with the name "FreeDV_FromRadio" and containing the current date and time. Clicking 'Record' again will stop recording.
The Audio tab inside Tools-Options allows control of where these recordings are saved. By default, this is inside the current user's Documents folder.
Multiple Configurations
By default, FreeDV uses the following locations to store configuration:
- Linux: ~/.freedv
- macOS: ~/Library/Preferences/FreeDV\ Preferences
- Windows: Registry (HKEY_CURRENT_USER\SOFTWARE\freedv)
If you'd like to store the configuration in another location (or store multiple configurations), FreeDV accepts the -f (or --config) command line arguments to provide an alternate location. An absolute path is recommended here; however, if only a relative path is provided, it will be relative to the following locations:
- Linux: ~/
- macOS: ~/Library/Preferences/
- Windows: C:\Users\[username]\AppData\Roaming
Executing FreeDV With a Different Configuration (Windows)
On Windows, you can create shortcuts to FreeDV with different file names for the "-f" command line option as described above. To create a shortcut, right-click on the Desktop or in File Explorer and choose New->Shortcut. Click on Browse and navigate to one of the following paths:
- C:\Program Files\FreeDV [version]\bin\freedv.exe
- C:\Program Files (x86)\FreeDV [version]\bin\freedv.exe (if the 32 bit version is installed on a 64 bit machine)
Click Next and give the shortcut a unique description (e.g. "FreeDV IC-7300"). Then push Finish to create the shortcut.
Once the shortcut has been created, right-click it and choose Properties. Find the Shortcut tab in the resulting dialog box and add "-f" followed by the desired filename to the end of the text in the Target field. Do not add any other quote marks.
For example, to use a file called IC7300.conf stored in the Hamradio directory on the C drive the Target field should appear as follows:
"C:\Program Files\FreeDV [version]\bin\freedv.exe" -f C:\Hamradio\IC7300.conf
FreeDV Reporting
FreeDV has the ability to send FreeDV signal reports to various online spotting services by enabling the option in Tools-Options (in the Reporting tab) and specifying your callsign and Maidenhead grid square. When enabled, this causes FreeDV to disable the free form Txt Msg field and only transmit the Callsign field. As this uses a different encoding format from the free-form text field, both sides of the contact must have this enabled for the contact to be reported.
FreeDV validates the received information before submitting a position report. This is to ensure that FreeDV does not report invalid callsigns to the service (e.g. ones that don't exist or that correspond to real non-FreeDV users). However, if the reporting function is disabled, all received text will display in the main window even if it has errors.
The following services are currently supported and can be individually enabled or disabled along with the reporting feature as a whole:
- PSK Reporter (using the "FREEDV" mode)
- FreeDV Reporter -- also accessible via the Tools->FreeDV Reporter menu option.
The frequency that FreeDV reports is set by changing the "Report Frequency" drop down box in the main window. This is either in kilohertz (kHz) or megahertz (MHz) (configurable by going to Tools->Options->Rig Control and checking or unchecking "Frequency entry in kHz") and will turn red if the entered value is invalid. If Hamlib support is also enabled, this frequency will automatically remain in sync with the current VFO on the radio (i.e. if the frequency is changed in the application, the radio will also change its frequency). Double-clicking on users in the Tools->FreeDV Reporter window will also cause this frequency to change to match the other user.
Note: in some setups (such as when using ALE), it is not preferred to have the reporting frequency automatically be in sync with the radio. For example, in the case of ALE, the radio's frequency changes multiple times per second while waiting for a contact, which is faster than FreeDV can pull the latest from the radio (every five seconds). This can be disabled by enabling "Manual Frequency Reporting" in Tools->Options.
FreeDV will also show the callsigns of previously received signals. To view those, click on the arrow next to the last received callsign at the bottom of the window. These are in descending order by time of receipt (i.e. the most recently received callsign will appear at the top of the list).
Multiple Mode Support
FreeDV can simultaneously decode the following modes when selected prior to pushing "Start":
- 700D/E
- 1600
- RADEV1
In addition, FreeDV can allow the user to switch between the above modes with the exception of RADEV1 for transmit without having to push "Stop" first. These features can be enabled by going to Tools->Options->Modem and checking the "Simultaneously Decode All HF Modes" option. Note that this may consume significant additional CPU resources, which can cause decode problems.
By default, FreeDV will use as many threads/cores in parallel as required to decode all supported HF modes. On some slower systems, it may be necessary to enable the "Use single thread for multiple RX operation" option as well. This results in FreeDV decoding each mode in series and additionally short circuits the list of modes to be checked when in sync.
Additionally, the squelch setting with simultaneous decode enabled is relative to the mode that supports the weakest signals (currently 700D). The squelch for other modes will be set to a value higher than the slider (which is calculated by adding the difference between the "Min SNR" of 700D and the mode in question; see "FreeDV Modes" below). For example, the squelch for 700E when the squelch slider is set to -2.0 becomes 1.0dB. This is designed to reduce undesired pops and clicks due to false decodes.
When using RADEV1, the squelch settings in the main window are ignored. Instead, FreeDV only passes decoded audio if it's able to synchronize with the incoming signal.
FreeDV Modes
The following table is a guide to the different modes, using analog SSB and Skype as anchors for a rough guide to audio quality:
| Mode | Min SNR | Fading | Latency | Speech Bandwidth | Speech Quality |
|---|---|---|---|---|---|
| SSB | 0 | 8/10 | low | 2600 | 5/10 |
| 1600 | 4 | 3/10 | low | 4000 | 4/10 |
| 700D | -2 | 4/10 | high | 4000 | 3/10 |
| 700E | 1 | 7/10 | medium | 4000 | 3/10 |
| RADEV1 | -2 | 8/10 | medium | 8000 | 7/10 |
| Skype | - | - | medium | 8000 | 8/10 |
The Min SNR is roughly the SNR where you cannot converse without repeating yourself. The numbers above are on channels without fading (AWGN channels like VHF radio). For fading channels the minimum SNR is a few dB higher. The Fading column shows how robust the mode is to HF Fading channels, higher is more robust.
The more advanced 700D and 2020 modes have a high latency due to the use of large Forward Error Correction (FEC) codes. They buffer many frames of speech, which combined with PC sound card buffering results in end-to-end latencies of 1-2 seconds. They may take a few seconds to sync at the start of an over, especially in fading channels.
FreeDV 700D
In mid 2018 FreeDV 700D was released, with a new OFDM modem, powerful Forward Error Correction (FEC) and optional interleaving. It uses the same 700 bit/s speech codec as the deprecated 700C mode. It operates at SNRs as low as -2dB, and has good HF channel performance. It is around 10dB better than FreeDV 1600 on fading channels, and is competitive with SSB at low SNRs. The FEC provides some protection from urban HF noise.
FreeDV 700D is sensitive to tuning. To obtain sync you must be within +/- 60Hz of the transmit frequency. This is straightforward with modern radios which are generally accurate to +/-1 Hz, but requires skill and practice when used with older, VFO based radios.
FreeDV 700E
FreeDV 700E was developed in December 2020 using lessons learned from on air operation of 700C and 700D. A variant of 700D, it uses a shorter frame size (80ms) to reduce latency and sync time. It is optimized for fast fading channels channels with up to 4Hz Doppler spread and 6ms delay spread. FreeDV 7000E uses the same 700 bit/s codec as FreeDV 700D. It requires about 3dB more power than 700D, but can operate reliably on fast fading channels.
The 700E release also includes optional compression (clipping) of the 700D and 700E transmit waveforms to reduce the Peak to Average Power Ratio to about 4dB. For example a 100W PEP transmitter can be driven to about 40W RMS. This is an improvement of 6dB over previous releases of FreeDV 700D. Before enabling the clipper make sure your transmitter is capable of handling sustained high average power without damage.
Clipping can be enabled via Tools-Options.
On good channels with high SNR clipping may actually reduce the SNR of the received signal. This is intentional - we are adding some pre-distortion in order to increase the RMS power. Forward error correction (FEC) will clean up any errors introduced by clipping, and on poor channels the benefits of increased signal power outweigh the slight reduction in SNR on good channels.
FreeDV RADEV1
RADE is a new mode with state-of-the-art performance, it is a contraction of Radio AutoencoDEr so-named because the modulation encoding uses a Machine-Learning method where the modulation and demodulation are achieved by training on a large number of speech samples over a modelled radio channel with typical propagation disturbances in phase and amplitude as found in HF radio. The speech is synthesised using the FARGAN neural vocoder (Frame-wise Auto-Regressive GAN) where GAN is a Generative Adversarial Network).
Unlike the previous FreeDV modes which all use QPSK modulation, the RADEV1 modulation produces an analog phase-amplitude output without defined constellation points. It has been chosen as it offers a combination of high speech quality together with reduced RF bandwidth and good resistance to fading and multipath HF radio channels.
Tools Menu
Tools - Filter
This section describes features on Tools-Filter.
| Control | Description |
|---|---|
| Noise Suppression | Enable noise suppression, de-reverberation, AGC of mic signal using the Speex pre-processor |
| 700D Auto EQ | Automatic equalization for FreeDV 700D/E Codec input audio |
Auto EQ (Automatic Equalization) adjusts the input speech spectrum to best fit the speech codec. It can remove annoying bass artifacts and make the codec speech easier to understand.
Bass/Mid/Treble (for both microphone and speaker) can also be adjusted here, either with the arrow keys or your mouse. A graph displaying the frequency response of the signal based on your current settings will display in this window as well.
Tools - Options
Modem Options
| Control | Description |
|---|---|
| Clipping | Increases the average power. Ensure your transmitter can handle high RMS powers before using! |
| TX Band Pass Filter | Reduces TX spectrum bandwidth |
Helping Improve FreeDV
If you have an interesting test case, for example:
- FreeDV working poorly with a particular person or microphone.
- Poor over the air performance on a fast fading channel.
- Problems with sync on strong signals.
- A comparison with SSB.
Please send the developers an off air recording of the signal. FreeDV can record files from your radio using Tools-Record File from Radio. A recording of 30 to 60 seconds is most useful.
With a recording we can reproduce your exact problem. If we can reproduce it we can fix it. Recordings are much more useful than anecdotes or subjective reports like "FreeDV doesn't work", "SSB is better", or "On 23 December it didn't work well on grid location XYZ". With subjective reports problems are impossible to reproduce, cannot be fixed, and you are unlikely to get the attention of the developers.
Multiple Panes in GUI window
It is possible to have multiple panes opened within the GUI window for example, to observe both the Waterfall and Spectrum Tabs. New panes may be added above, below, left or right of existing panes.
A new visible pane is created by hovering the cursor over the required Tab, click and hold the left mouse button and drag the Tab to the required position and releasing the mouse button. If currently two panes are stacked vertically a third pane may be added either beside either pane or to the left/right of both panes. If the Tab is required adjacent to both panes then it must be dragged to the left/right of the junction of the existing Tabs.
As the Tab is dragged into position a faint blue/gray image will show the position to be occupied by the pane. Panes may be relocated back to the menu bar by a similar process.
Tabs can be resized as required by hovering the cursor over the border and clicking and holding the left mouse button and dragging to required size.
By default, the tab layout is not saved. However, by enabling experimental features (see "Advanced/Developer Features"), experimental support for saving and restoring the tab layout will be enabled. This has not been well tested and may have hidden bugs or other issues.

Advanced/Developer Features
Stats Window
Located on the lower left hand side of the main screen.
| Term | Notes |
|---|---|
| Bits | Number of bits demodulated |
| Errs | Number of bit errors detected |
| Resyncs | Number of times the demodulator has resynced |
| ClkOff | Estimated sample clock offset in parts per million |
| FreqOff | Estimated frequency offset in Hz |
| Sync | Sync metric (OFDM modes like 700D/E) |
| Var | Speech encoder distortion for 700D (see Auto EQ) |
The sample clock offset is the estimated difference between the modulator (TX) and demodulator (RX) sample clocks. For example if the transmit station sound card is sampling at 44000 Hz and the receive station sound card 44001 Hz, the sample clock offset would be ((44000-44001)/44000)*1E6 = 22.7 ppm.
Timing Delta Tab
This indicates the symbol timing estimate of the demodulator, in the range of +/- 0.5 of a symbol. With off air signals this will have a sawtooth appearance, as the demod tracks the modulator sample clock. The steeper the slope, the greater the sample clock offset.
Sound Card Debug
These features were added for FreeDV 700D, to help diagnose sound card issues during development.
Tools - Options dialog:
Debug FIFO and PortAudio counters: used for debugging audio problems on 700D. During beta testing there were problems with break up in the 700D TX and RX audio on Windows.
The PortAudio counters (PortAudio1 and PortAudio2) should not increment when running in TX or RX, as this indicates samples are being lost by the sound driver which will lead to sync problems.
The Fifo counter outempty1 counter should not increment during TX, as this indicates FreeDV is not supplying samples fast enough to the PortAudio drivers. The results will be resyncs at the receiver.
Check these counters by pressing Start, then Reset them and observe the counters for 30 seconds.
If the PortAudio counters are incrementing on receive try:
-
Adjusting framesPerBuffer; try 0, 128, 256, 512, 1024.
-
Shut down other applications that might be using audio, such as Skype or your web browser.
-
A different sound card rate such as 44.1kHz instead of 48kHz.
If the outempty1 counter is incrementing on transmit try increasing the FifoSize.
The txThreadPriority checkbox reduces the priority of the main txRX thread in FreeDV which may help the sound driver thread process samples.
The txRXDumpTiming check box dumps timing information to a console that is used for debugging the RX break up problem on 700D. Each number is how many ms the txRXThread took to run.
The txRXDumpTiming check box dumps the number of samples free in the TX FIFO sending samples to the TX. If this hits zero, your TX audio will break up and the RX will lose sync. TX audio break up will also occur if you see "outfifo1" being incremented on the "Fifo" line during TX. Try increasing the FifoSize.
Full Duplex Testing with loopback
Tools - Options - Half Duplex check box
FreeDV GUI can operate in full duplex mode which is useful for development or listening to your own FreeDV signal as only one PC is required. Normal operation is half duplex.
TX and RX signals can be looped back via an analog connection between the sound cards.
On Linux, using the ALSA loopback module:
  $ sudo modprobe snd-aloop
  $ ./freedv

  In Tools - Audio Config - Receive Tab  - From Radio select -> Loopback: Loopback PCM (hw:1,0)
                          - Transmit Tab - To Radio select   -> Loopback: Loopback PCM (hw:1,1)
Experimental Features
Occasionally there are some features that may be unstable or otherwise not ready to officially be released. To experiment with these features, you can go to Tools->Options->Debugging and enable "Enable Experimental Features". Note that if you have problems after enabling this setting, it is recommended to disable it again to verify that an experimental feature is not causing trouble. (Additionally, if you're able to confirm that an experimental feature is causing problems, please file a bug report!)
Tips
- The space bar can be used to toggle PTT.
- You can left click on the main window to adjust tuning, the vertical red line on the frequency scale will show the current center frequency. FreeDV will automatically track any drift once it syncs.
Common Problems
FreeDV Sets Radio To Wrong Mode
By default, FreeDV attempts to set the radio's mode to DIGU/USB-D (or LSB equivalent for 40 meters and below). Some radios do not support data modes and only have USB and LSB. For these, you can go to Tools->Options->Rig Control and check the "Use USB/LSB instead of DIGU/DIGL" option. This will cause FreeDV to use the standard USB and LSB modes for rig control instead.
Note that for best results, your radio should have all processing disabled if you're using the standard USB/LSB modes. This disabling of processing typically takes place when using data mode.
Overdriving Transmit Level
This is a very common problem for first time FreeDV users. Adjust your transmit levels so the ALC is just being nudged. More power is not better with FreeDV. An overdriven signal will have poor SNR at the receiver. For FreeDV 700D/700E operation with the clipper, make sure your transmitter can sustain high average power levels without damage (e.g. 40W RMS on a 100W PEP radio).
I can't set up FreeDV, especially the Sound Cards
This can be challenging the first time around:
-
Try a receive only (one audio card) set up first.
-
Ask someone who already runs FreeDV for help.
-
If you don't know anyone local, ask for help on the digital voice mailing list. Be specific about the hardware you have and the exact nature of your problem.
Hamlib does not work with my Icom radio
The most common issue with Icom radios is that the CI-V address configured in FreeDV does not match the address configured in the radio. Ensure that the CI-V address in both FreeDV and on the radio are the same. If "00" is used on the FreeDV side, ensure that the "CI-V Transceive" option is enabled on the radio or else the radio will not respond to requests directed to that address.
On newer radios (e.g. 7300, 7610), you may also need to set "CI-V USB Echo Back" to ON as this may be set to OFF by default.
I need help with my radio or rig interface
There are many radios, many computers, and many sound cards. It is impossible to test them all. Many radios have intricate menus with custom settings. It is unreasonable to expect the authors of FreeDV to have special knowledge of your exact hardware.
However someone may have worked through the same problem as you. Ask on the digital voice mailing list.
Can't hear anything on receive
Many FreeDV modes will not play any audio if there is no valid signal. You may also have squelch set too high. In some modes the Analog button will let you hear the received signal from the SSB radio.
Try the Test Wave Files above to get a feel for what a FreeDV signal looks and sounds like.
The signal is strong but FreeDV won't get sync and decode
Do you have the correct sideband? See USB or LSB section.
Is it a FreeDV signal? SSTV uses similar frequencies. To understand what FreeDV sounds like, see the Test Wave Files section.
Trouble getting Sync with 700D
You need to be within +/- 60 Hz on the transmit signal. It helps if both the TX and RX stations tune to known, exact frequencies such as exactly 7.177MHz. On channels with fast fading sync may take a few seconds.
PTT doesn't work. It works with Fldigi and other Hamlib applications.
Many people struggle with initial CAT control and PTT setup:
-
Read the "CAT/PTT Configuration" section above.
-
Try the "Test PTT" button inside Tools->CAT and PTT Config.
-
Check your rig serial settings. Did you change them from defaults for another program?
-
Linux version: do you have permissions for the serial port? Are you a member of the
dialoutgroup? -
Ask someone who already uses FreeDV to help.
-
Contact the digital voice mailing list. Be specific about your hardware, what you have tried, and the exact nature of the problem.
I'm on Windows and serial port PTT doesn't work with my USB to serial adapter.
Please verify that you are running the correct drivers for the USB to serial adapter that you're using. Information and download links for the drivers used by the most common devices can be found here.
While it is preferred to use devices that use authorized/original versions of the various USB to serial chipsets, it is possible to use some cloned devices with older drivers. When doing this, you may also need to force Windows to use an older version of a driver instead of automatically updating the driver on reboot. See here for instructions on doing so in Windows 10. For Windows 8:
- Search for "Change device" in the Windows 8 Start menu.
- Click on where it says "Change device installation settings".
- Select the "No, let me choose what to do" option.
- Check the "automatically get the device app" option, then click Save changes to save the settings you just chose.
I installed a new version and FreeDV stopped working
You may need to clean out the previous configuration. Try Tools - Restore Defaults. Set up your sound cards again with Tools - Audio Config.
FreeDV crashes when I press Start
Have you removed/changed USB audio devices? If you remove/change USB audio devices without pressing Tools - Audio Config, FreeDV may crash. See Changing Audio Devices above.
FreeDV can't be opened on macOS because the developer cannot be verified
From January 2020 Apple is enforcing notarization for all macOS applications. The FreeDV developers do not wish to operate within the Apple ecosystem due to the cost/intrusiveness of this requirement.

Security & Privacy shows the Open Anyway option for FreeDV:


Or you can use command line options:
xattr -d com.apple.quarantine FreeDV.app
or
xattr -d -r com.apple.quarantine FreeDV.app
I'm on a Mac and my preferred audio device isn't appearing
macOS has a longstanding issue that prevents certain audio devices from appearing. More info here.
Converting this document to PDF
For the Linux inclined:
$ pandoc USER_MANUAL.md -o USER_MANUAL.pdf "-fmarkdown-implicit_figures -o" \
--from=markdown -V geometry:margin=.4in --toc --highlight-style=espresso
Glossary
| Term | Notes |
|---|---|
| AWGN | Additive White Gaussian Noise - a channel with just noise and no fading (like VHF) |
| FEC | Forward Error Correction - extra bits to we send to protect the speech codec bits |
| LDPC | Low Density Parity Check Codes - a family of powerful FEC codes |
Release Notes
V2.0.1 TBD 2025
- Bugfixes:
- Reduce latency when going between TX->RX with Hamlib configured. (PR #893)
- Reduce usage of non-real time safe code. (PR #900)
- FreeDV Reporter: Force explicit background color (avoids unwanted mouseover highlights on Linux). (PR #911)
- Fix compiler errors when using wxWidgets 3.0. (PR #914)
- Unit tests: Increase sleep time before killing recording to resolve macOS test failures. (PR #917)
- Fix typo causing RX radio device to remain open. (PR #918)
- Fix WASAPI errors on some machines by supporting audio mix formats other than 16-bit integer. (PR #919)
- Documentation:
V2.0.0 June 2025
This version contains the first official release of the RADE V1 mode previously trialled over several preview releases. Radio Autoencoder (RADE) technology is a new approach to sending speech over HF radio. It combines Machine Learning (ML) with classical DSP to send high quality speech over HF radio at SNRs as low as -2dB in a bandwidth of 1500 Hz. More information about Radio Autoencoder can be found at https://freedv.org/radio-autoencoder/.
- Bugfixes:
- Fix bug preventing saving of the previously used path when playing back files. (PR #729)
- Fix bug preventing proper time display in FreeDV Reporter on macOS. (PR #748)
- Hamlib: Improve behavior with Icom rigs, serial port PTT. (PR #875)
- Fix various audio dropout issues, especially on Linux. (PR #761)
- Fix issue preventing non-ASCII text from appearing properly in FreeDV Reporter messages. (PR #812)
- Don't adjust Msg column width when user disconnects. (PR #828)
- Fix issue preventing suppression of the Msg tooltip for non-truncated messages. (PR #829)
- Preserve Hamlib rig names on startup to guard against changes by Hamlib during execution. (PR #834)
- Fix dropouts related to virtual audio cables. (PR #840)
- Report "unk" for mode on Hamlib disconnect. (PR #851)
- Fix deadlocks and crashes while using Play/Record buttons in Audio Options window. (PR #871)
- Fix issue causing PTT button to remain active after pushing it. (PR #871)
- Fix rendering issue causing random spikes in From Mic plot. (PR #871)
- Enhancements:
- Show green line indicating RX frequency. (PR #725)
- Update configuration of the Voice Keyer feature based on user feedback. (PR #730, #746, #793)
- Add monitor volume adjustment. (PR #733)
- Avoid modifying the audio device configuration without the user explicitly doing so. (PR #735)
- If provided by user, add config file to titlebar. (PR #738)
- Minor adjustments to spectrum/waterfall tooltips. (PR #743)
- Implement new logging framework. (PR #773)
- Windows: Detect whether microphone permissions have been granted and display error if not. (PR #790)
- Add rig control option to prevent auto-adjustment of the radio's current mode. (PR #809)
- Update default 80 and 160m calling frequencies. (PR #831)
- Shorten PulseAudio/pipewire app name. (PR #843)
- Hamlib: support CAT PTT via the Data port instead of Mic (needed for some older radios). (PR #875)
- macOS: Show /dev/tty.* devices in CAT/PTT options. (PR #883)
- Remove pre-PTT interrogation of frequency/mode to improve TX/RX switching time. (PR #898)
- Build system:
- Miscellaneous:
Note: Official Windows releases are now signed using Software Freedom Conservancy's code certificate. To validate that the installers and binary files are properly signed, right-click on the file, choose Properties and go to the 'Digital Signatures' tab.
Earlier than V2.0.0
See this for more information about changes in versions prior to v1.9.0.